内容插槽
DayFlow 采用了基于插槽的架构,允许您直接从所使用的框架(React、Vue 等)中注入自定义 UI 组件到核心日历引擎中。
这是通过 ContentSlot 机制实现的。虽然核心引擎为大多数 UI 元素提供了默认实现(使用 Preact),但您可以覆盖它们以符合您的应用设计或使用特定的第三方库。
Table of Contents
工作原理
- 核心定义插槽:在
@dayflow/core内部,某些 UI 区域被包装 in aContentSlot中。每个插槽都有一个generatorName(生成器名称)和generatorArgs(生成器参数)。 - 您提供实现:您将组件或渲染函数传递给
DayFlowCalendar组件。适配器随后会将您的组件以 Portal(传送门)的形式渲染到核心定义的精确位置。
可用插槽
| 生成器名称 | 描述 | 参数 |
|---|---|---|
colorPicker | 用于事件颜色的迷你颜色选择器。 | { color, onChange, onChangeComplete } |
createCalendarDialogColorPicker | 对话框中使用功能完整的颜色选择器。 | { color, onChange, onAccept, onCancel, styles } |
eventContent* | 事件卡片的自定义渲染(例如 eventContentDay)。 | { event, viewType, isAllDay, isMobile, isSelected, isDragging, layout } |
eventContextMenu | 自定义事件右键菜单。 | { event, onClose } |
eventDetailContent | 事件详情打开时在弹出框/面板中显示的内容。 | { event, isAllDay, onEventDelete, onEventUpdate, onClose, app } |
eventDetailDialog | 事件详情打开时显示的自定义对话框。需要在 useCalendarApp 中设置 useEventDetailDialog: true。 | { event, isOpen, isAllDay, onEventDelete, onEventUpdate, onClose, app } |
gridContextMenu | 日历单元格 / 网格的自定义右键上下文菜单。 | { date, viewType, onClose } |
gridPopupContent | 年视图 Grid 模式(gridDateClick: 'popup')下日期弹窗的自定义内容。 | { date, events } |
mobileEventDetail | 自定义移动端事件详情抽屉 / 对话框。 | { isOpen, onClose, onSave, onEventDelete, draftEvent, app, timeFormat } |
sidebarCalendarColorPicker | 侧边栏中用于日历颜色的颜色选择器。 | { color, onChange, onChangeComplete } |
titleBarSlot | 侧边栏标题栏中的额外内容。 | { isCollapsed, toggleCollapsed } |
事件内容
eventContent 插槽允许您完全自定义事件在日历中的渲染方式。与其他插槽不同,事件内容必须针对每个视图分别指定,以确保布局与每个视图特定的事件结构保持一致。
视图特定插槽
| 插槽名称 | 描述 |
|---|---|
eventContentDay | 重写天视图(Day View)中的定时事件。 |
eventContentWeek | 重写周视图(Week View)中的定时事件。 |
eventContentMonth | 重写月视图(Month View)中的事件。 |
eventContentYear | 重写年视图(Year View)中的事件。 |
eventContentAllDayDay | 重写天视图(Day View)中的全天事件。 |
eventContentAllDayWeek | 重写周视图(Week View)中的全天事件。 |
eventContentAllDayMonth | 重写月视图(Month View)中的全天事件。 |
eventContentAllDayYear | 重写年视图(Year View)中的全天事件。 |
查看源代码
import { DayFlowCalendar } from '@dayflow/react';

function MyCalendar() {
  return (
    <DayFlowCalendar
      calendar={calendar}
      // 自定义天视图的事件渲染
      eventContentDay={({ event, isSelected }) => (
        <div className='custom-event-card'>
          <span>{event.title}</span>
          {/* ... 自定义图标或布局 */}
        </div>
      )}
      // 自定义月视图的事件渲染
      eventContentMonth={({ event }) => (
        <div className='flex items-center gap-1'>
          <span>🗓️</span>
          <span className='truncate'>{event.title}</span>
        </div>
      )}
      // 省略其他视图的重写以保持简洁...
    />
  );
}<template>
<DayFlowCalendar :calendar="calendar">
<!-- 自定义天视图的事件渲染 -->
<template #eventContentDay="{ event, isSelected }">
<div class="custom-event-card">
<span>{{ event.title }}</span>
<!-- ... 自定义图标或布局 -->
</div>
</template>
<!-- 自定义月视图的事件渲染 -->
<template #eventContentMonth="{ event }">
<div class="flex items-center gap-1">
<span>🗓️</span>
<span class="truncate">{{ event.title }}</span>
</div>
</template>
<!-- 省略其他视图的重写以保持简洁... -->
</DayFlowCalendar>
</template>
<script setup>
import { DayFlowCalendar } from '@dayflow/vue';
</script>import { Component } from '@angular/core';
import { DayFlowCalendarModule } from '@dayflow/angular';
@Component({
selector: 'app-root',
standalone: true,
imports: [DayFlowCalendarModule],
template: `
<dayflow-calendar
[calendar]="calendar"
[eventContentDay]="dayTemplate"
[eventContentMonth]="monthTemplate"
>
</dayflow-calendar>
<!-- 自定义天视图的事件渲染 -->
<ng-template #dayTemplate let-args>
<div class="custom-event-card">
<span>{{ args.event.title }}</span>
<!-- ... 自定义图标或布局 -->
</div>
</ng-template>
<!-- 自定义月视图的事件渲染 -->
<ng-template #monthTemplate let-args>
<div class="flex items-center gap-1">
<span>🗓️</span>
<span class="truncate">{{ args.event.title }}</span>
</div>
</ng-template>
<!-- 省略其他视图的重写以保持简洁... -->
`
})
export class AppComponent {
// calendar = ...
}<!-- App.svelte -->
<script lang="ts">
import { DayFlowCalendar } from '@dayflow/svelte';
import DayEvent from './DayEvent.svelte';
import MonthEvent from './MonthEvent.svelte';
</script>
<DayFlowCalendar
{calendar}
eventContentDay={DayEvent}
eventContentMonth={MonthEvent}
<!-- 省略其他视图的重写以保持简洁... -->
/>
<!-- DayEvent.svelte (自定义天视图的事件渲染) -->
<script lang="ts">
import type { EventContentSlotArgs } from '@dayflow/core';
let { event, isSelected } = $props<EventContentSlotArgs>();
</script>
<div class="custom-event-card">
<span>{event.title}</span>
<!-- ... 自定义图标或布局 -->
</div>
<!-- MonthEvent.svelte (自定义月视图的事件渲染) -->
<script lang="ts">
import type { EventContentSlotArgs } from '@dayflow/core';
let { event } = $props<EventContentSlotArgs>();
</script>
<div class="flex items-center gap-1">
<span>🗓️</span>
<span class="truncate">{event.title}</span>
</div>事件详情内容
eventDetailContent 插槽允许您自定义事件详情打开时在详情弹出层或面板中显示的内容。
查看源代码
import { useCallback } from 'react';
import { DayFlowCalendar } from '@dayflow/react';

function MyCalendar() {
  const detailPanel = useCallback(
    ({ event, onEventDelete, onEventUpdate, onClose }) => {
      return (
        <div className='p-4 space-y-3'>
          <h5 className='font-bold'>{event.title}</h5>
          <p>{event.description}</p>

          <div className='flex gap-2'>
            <button
              onClick={() => onEventUpdate({ ...event, title: '已更新' })}
            >
              更新
            </button>
            <button onClick={() => onEventDelete(event.id)}>删除</button>
          </div>
        </div>
      );
    },
    []
  );

  return (
    <DayFlowCalendar calendar={calendar} eventDetailContent={detailPanel} />
  );
}<template>
<DayFlowCalendar :calendar="calendar">
<template #eventDetailContent="{ event, onEventDelete, onEventUpdate }">
<div class="p-4 space-y-3">
<h5 class="font-bold">{{ event.title }}</h5>
<p>{{ event.description }}</p>
<div class="flex gap-2">
<button @click="onEventUpdate({ ...event, title: '已更新' })">
更新
</button>
<button @click="onEventDelete(event.id)">删除</button>
</div>
</div>
</template>
</DayFlowCalendar>
</template>
<script setup>
import { DayFlowCalendar } from '@dayflow/vue';
</script>import { Component } from '@angular/core';
import { DayFlowCalendarModule } from '@dayflow/angular';
@Component({
selector: 'app-root',
standalone: true,
imports: [DayFlowCalendarModule],
template: `
<dayflow-calendar
[calendar]="calendar"
[eventDetailContent]="detailTemplate"
>
</dayflow-calendar>
<ng-template #detailTemplate let-args>
<div class="p-4 space-y-3">
<h5 class="font-bold">{{ args.event.title }}</h5>
<p>{{ args.event.description }}</p>
<div class="flex gap-2">
<button (click)="args.onEventUpdate({ ...args.event, title: '已更新' })">
更新
</button>
<button (click)="args.onEventDelete(args.event.id)">删除</button>
</div>
</div>
</ng-template>
`
})
export class AppComponent {
// calendar = ...
}<!-- App.svelte -->
<script lang="ts">
import { DayFlowCalendar } from '@dayflow/svelte';
import CustomDetailPanel from './CustomDetailPanel.svelte';
</script>
<DayFlowCalendar {calendar} eventDetailContent={CustomDetailPanel} />
<!-- CustomDetailPanel.svelte -->
<script lang="ts">
import type { EventDetailContentProps } from '@dayflow/core';
let { event, onEventDelete, onEventUpdate } = $props<EventDetailContentProps>();
</script>
<div class="p-4 space-y-3">
<h5 class="font-bold">{event.title}</h5>
<p>{event.description}</p>
<div class="flex gap-2">
<button onclick={() => onEventUpdate({ ...event, title: '已更新' })}>
更新
</button>
<button onclick={() => onEventDelete(event.id)}>删除</button>
</div>
</div>事件详情对话框
如果您更喜欢使用对话框/模态框来查看和编辑事件详情,可以使用 eventDetailDialog 插槽。这对于移动优先的应用或需要更多空间展示复杂事件数据的情况特别有用。
前提条件:在
useCalendarApp中设置useEventDetailDialog: true以激活对话框模式。若未设置,插槽将不会被触发。
仅关闭面板:若您想在不提供自定义对话框的情况下隐藏内置浮动面板,请在
useCalendarApp中设置useEventDetailPanel: false,而非使用插槽。
查看源代码
import { useCallback } from 'react';
import { DayFlowCalendar } from '@dayflow/react';

function MyCalendar() {
  const customDialog = useCallback(({ event, isOpen, onClose }) => {
    if (!isOpen) return null;

    return (
      <div className='fixed inset-0 z-50 flex items-center justify-center bg-black/50'>
        <div className='bg-white p-6 rounded-lg shadow-xl'>
          <h2>{event.title}</h2>
          {/* ... 在此构建您的自定义对话框 UI */}
          <button onClick={onClose}>关闭</button>
        </div>
      </div>
    );
  }, []);

  return (
    <DayFlowCalendar calendar={calendar} eventDetailDialog={customDialog} />
  );
}<template>
<DayFlowCalendar :calendar="calendar">
<template #eventDetailDialog="{ event, isOpen, onClose }">
<div v-if="isOpen" class="fixed inset-0 z-50 flex items-center justify-center bg-black/50">
<div class="bg-white p-6 rounded-lg shadow-xl">
<h2>{{ event.title }}</h2>
<!-- ... 在此构建您的自定义对话框 UI -->
<button @click="onClose">关闭</button>
</div>
</div>
</template>
</DayFlowCalendar>
</template>
<script setup>
import { DayFlowCalendar } from '@dayflow/vue';
</script>import { Component } from '@angular/core';
import { DayFlowCalendarModule } from '@dayflow/angular';
@Component({
selector: 'app-root',
standalone: true,
imports: [DayFlowCalendarModule],
template: `
<dayflow-calendar
[calendar]="calendar"
[eventDetailDialog]="dialogTemplate"
>
</dayflow-calendar>
<ng-template #dialogTemplate let-args>
<div *ngIf="args.isOpen" class="fixed inset-0 z-50 flex items-center justify-center bg-black/50">
<div class="bg-white p-6 rounded-lg shadow-xl">
<h2>{{ args.event.title }}</h2>
<!-- ... 在此构建您的自定义对话框 UI -->
<button (click)="args.onClose()">关闭</button>
</div>
</div>
</ng-template>
`
})
export class AppComponent {
// calendar = ...
}<!-- App.svelte -->
<script lang="ts">
import { DayFlowCalendar } from '@dayflow/svelte';
import CustomDetailDialog from './CustomDetailDialog.svelte';
</script>
<DayFlowCalendar {calendar} eventDetailDialog={CustomDetailDialog} />
<!-- CustomDetailDialog.svelte -->
<script lang="ts">
import type { EventDetailDialogProps } from '@dayflow/core';
let { event, isOpen, onClose } = $props<EventDetailDialogProps>();
</script>
{#if isOpen}
<div class="fixed inset-0 z-50 flex items-center justify-center bg-black/50">
<div class="bg-white p-6 rounded-lg shadow-xl">
<h2>{event.title}</h2>
<!-- ... 在此构建您的自定义对话框 UI -->
<button onclick={onClose}>关闭</button>
</div>
</div>
{/if}移动端事件详情
当在移动设备(或小屏幕)上查看 DayFlow 时,它使用专门的 mobileEventDetail 插槽来处理事件的创建和编辑。默认情况下,这是一个全屏抽屉。
Tap an event to open the mobile drawer. This showcase runs in an iframe so DayFlow reads a real mobile viewport instead of the desktop window.
查看源代码
import { useCallback } from 'react';
import { DayFlowCalendar } from '@dayflow/react';

function MyCalendar() {
  const customMobileDrawer = useCallback(
    ({ isOpen, onClose, onSave, onEventDelete, draftEvent }) => {
      if (!isOpen || !draftEvent) return null;

      return (
        <div className='fixed inset-0 z-50 flex flex-col bg-white'>
          <header className='flex items-center justify-between p-4 border-b'>
            <button onClick={onClose}>返回</button>
            <h2>{draftEvent.id ? '编辑' : '新建'}事件</h2>
            <button onClick={() => onSave(draftEvent)}>保存</button>
          </header>
          <div className='p-4'>
            <input
              defaultValue={draftEvent.title}
              onChange={e => (draftEvent.title = e.target.value)}
            />
            {/* ... 构建您的移动端优化 UI */}
          </div>
        </div>
      );
    },
    []
  );

  return (
    <DayFlowCalendar
      calendar={calendar}
      mobileEventDetail={customMobileDrawer}
    />
  );
}<template>
<DayFlowCalendar :calendar="calendar">
<template #mobileEventDetail="{ isOpen, onClose, onSave, draftEvent }">
<div v-if="isOpen && draftEvent" class="fixed inset-0 z-50 flex flex-col bg-white">
<header class="flex items-center justify-between p-4 border-b">
<button @click="onClose">返回</button>
<h2>{{ draftEvent.id ? '编辑' : '新建' }}事件</h2>
<button @click="onSave(draftEvent)">保存</button>
</header>
<div class="p-4">
<input
:value="draftEvent.title"
@input="draftEvent.title = $event.target.value"
/>
<!-- ... 构建您的移动端优化 UI -->
</div>
</div>
</template>
</DayFlowCalendar>
</template>
<script setup>
import { DayFlowCalendar } from '@dayflow/vue';
</script>import { Component } from '@angular/core';
import { DayFlowCalendarModule } from '@dayflow/angular';
@Component({
selector: 'app-root',
standalone: true,
imports: [DayFlowCalendarModule],
template: `
<dayflow-calendar
[calendar]="calendar"
[mobileEventDetail]="mobileTemplate"
>
</dayflow-calendar>
<ng-template #mobileTemplate let-args>
<div *ngIf="args.isOpen && args.draftEvent" class="fixed inset-0 z-50 flex flex-col bg-white">
<header class="flex items-center justify-between p-4 border-b">
<button (click)="args.onClose()">返回</button>
<h2>{{ args.draftEvent.id ? '编辑' : '新建' }}事件</h2>
<button (click)="args.onSave(args.draftEvent)">保存</button>
</header>
<div class="p-4">
<input
[value]="args.draftEvent.title"
(input)="args.draftEvent.title = $any($event.target).value"
/>
<!-- ... 构建您的移动端优化 UI -->
</div>
</div>
</ng-template>
`
})
export class AppComponent {
// calendar = ...
}<!-- App.svelte -->
<script lang="ts">
import { DayFlowCalendar } from '@dayflow/svelte';
import CustomMobileDrawer from './CustomMobileDrawer.svelte';
</script>
<DayFlowCalendar {calendar} mobileEventDetail={CustomMobileDrawer} />
<!-- CustomMobileDrawer.svelte -->
<script lang="ts">
import type { MobileEventProps } from '@dayflow/core';
let { isOpen, onClose, onSave, draftEvent } = $props<MobileEventProps>();
</script>
{#if isOpen && draftEvent}
<div class="fixed inset-0 z-50 flex flex-col bg-white">
<header class="flex items-center justify-between p-4 border-b">
<button onclick={onClose}>返回</button>
<h2>{draftEvent.id ? '编辑' : '新建'}事件</h2>
<button onclick={() => onSave(draftEvent)}>保存</button>
</header>
<div class="p-4">
<input
value={draftEvent.title}
oninput={(e) => draftEvent.title = e.currentTarget.value}
/>
<!-- ... 构建您的移动端优化 UI -->
</div>
</div>
{/if}注入自定义颜色选择器
默认情况下,DayFlow 使用内置的 BlossomColorPicker。如果您更喜欢使用 react-color 或 vue-color 等库,可以使用 colorPicker 插槽进行注入。
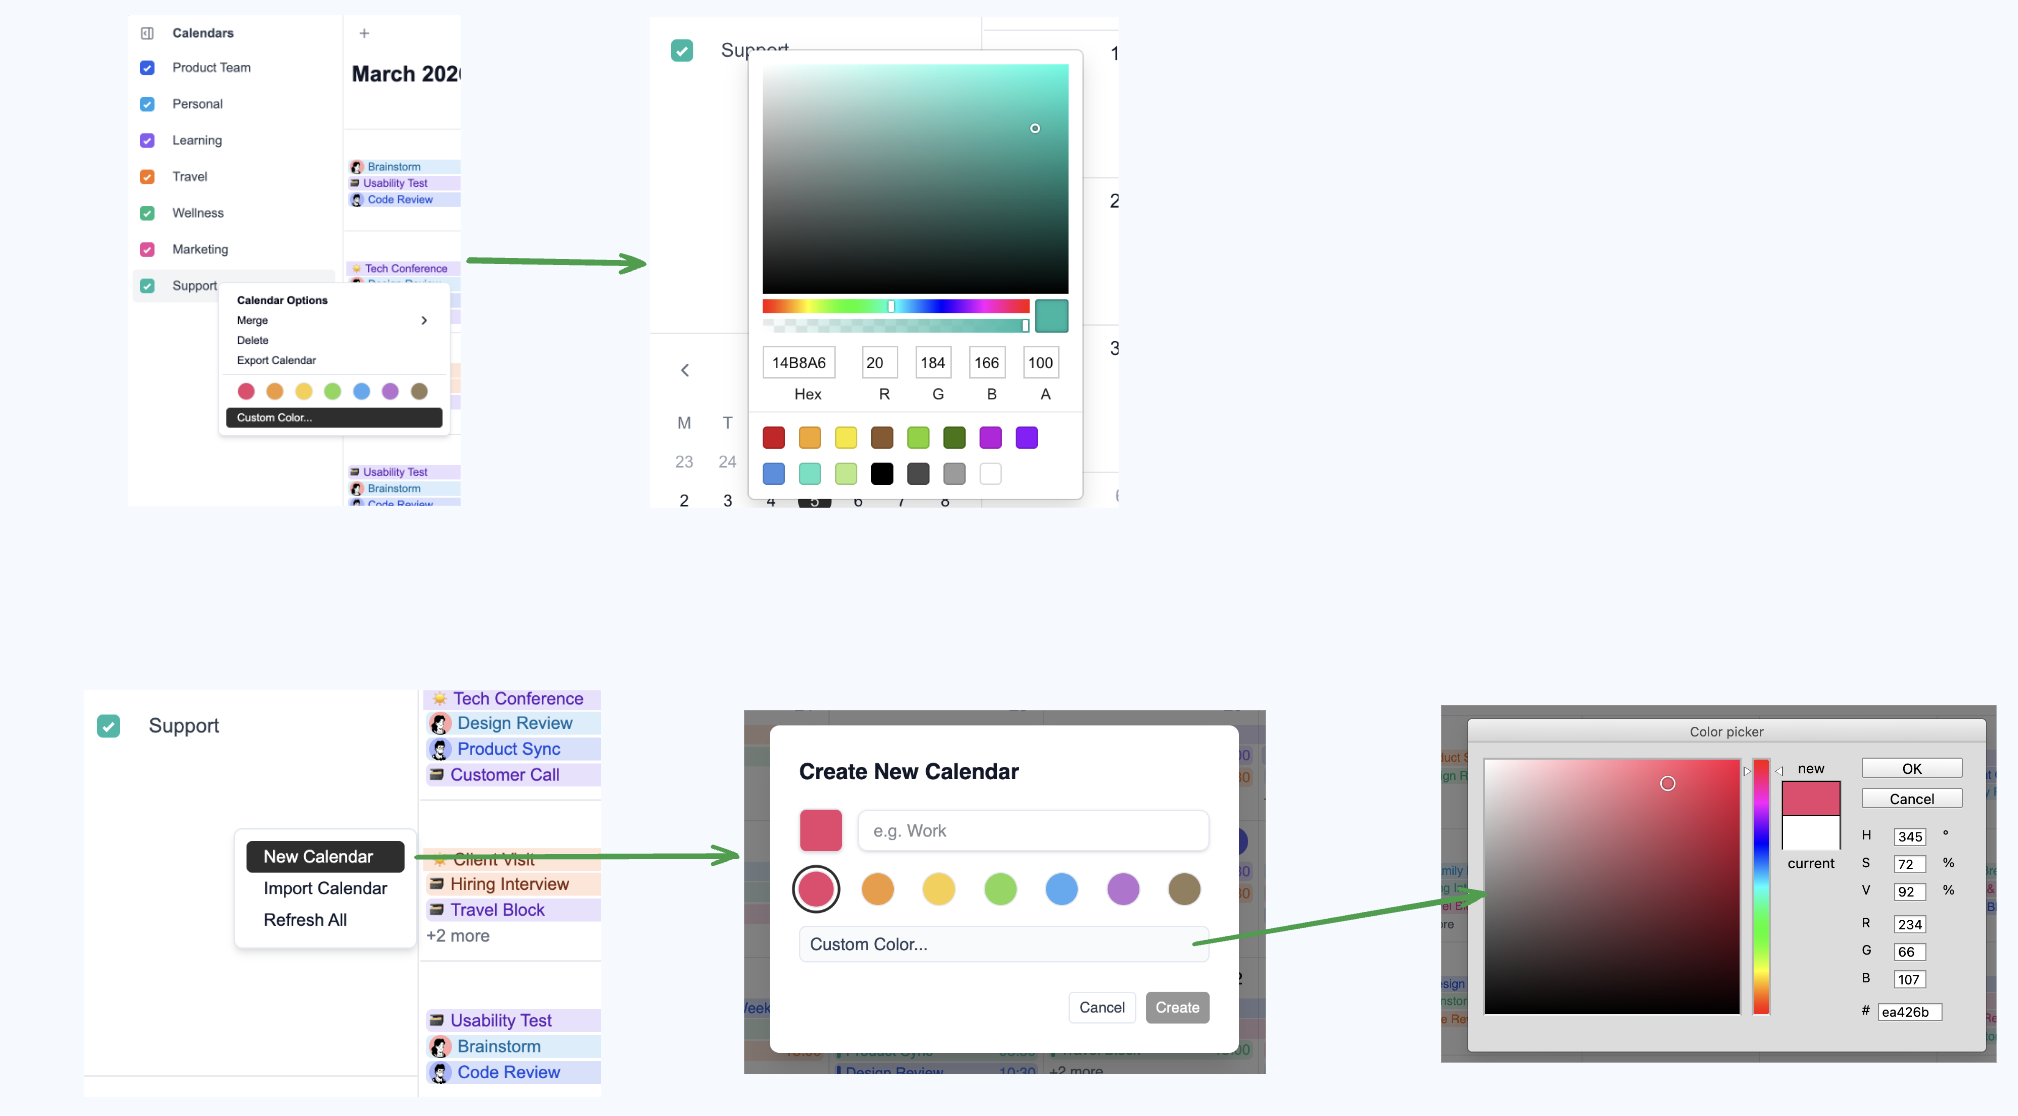
React 示例
安装 react-color:
将其注入到 DayFlowCalendar:
查看源代码
import { DayFlowCalendar } from '@dayflow/react';
import { SketchPicker, PhotoshopPicker } from 'react-color';

function MyCalendar() {
  return (
    <DayFlowCalendar
      calendar={calendar}
      colorPicker={args => (
        <SketchPicker
          color={args.color}
          onChange={color => args.onChange({ hex: color.hex })}
        />
      )}
      createCalendarDialogColorPicker={args => (
        <PhotoshopPicker
          color={args.color}
          onChange={color => args.onChange({ hex: color.hex })}
          onAccept={args.onAccept}
          onCancel={args.onCancel}
        />
      )}
    />
  );
}<template>
<DayFlowCalendar :calendar="calendar">
<template #colorPicker="args">
<SketchPicker
:color="args.color"
@change="color => args.onChange({ hex: color.hex })"
/>
</template>
<template #createCalendarDialogColorPicker="args">
<PhotoshopPicker
:color="args.color"
@change="color => args.onChange({ hex: color.hex })"
@accept="args.onAccept"
@cancel="args.onCancel"
/>
</template>
</DayFlowCalendar>
</template>
<script setup>
import { DayFlowCalendar } from '@dayflow/vue';
import { SketchPicker, PhotoshopPicker } from 'vue-color'; // 或者是其他库
</script>import { Component } from '@angular/core';
import { DayFlowCalendarModule } from '@dayflow/angular';
@Component({
selector: 'app-root',
standalone: true,
imports: [DayFlowCalendarModule],
template: `
<dayflow-calendar
[calendar]="calendar"
[colorPicker]="pickerTemplate"
[createCalendarDialogColorPicker]="dialogPickerTemplate"
>
</dayflow-calendar>
<ng-template #pickerTemplate let-args>
<!-- 在此使用您自定义的 Angular 颜色选择器组件 -->
<sketch-picker
[color]="args.color"
(colorChange)="args.onChange({ hex: $event })"
>
</sketch-picker>
</ng-template>
<ng-template #dialogPickerTemplate let-args>
<photoshop-picker
[color]="args.color"
(colorChange)="args.onChange({ hex: $event })"
(accept)="args.onAccept()"
(cancel)="args.onCancel()"
>
</photoshop-picker>
</ng-template>
`
})
export class AppComponent {
// calendar = ...
}<!-- App.svelte -->
<script lang="ts">
import { DayFlowCalendar } from '@dayflow/svelte';
import ColorPicker from './ColorPicker.svelte';
import DialogColorPicker from './DialogColorPicker.svelte';
</script>
<DayFlowCalendar
{calendar}
colorPicker={ColorPicker}
createCalendarDialogColorPicker={DialogColorPicker}
/>
<!-- ColorPicker.svelte -->
<script lang="ts">
import type { ColorPickerProps } from '@dayflow/core';
// 在此使用您自定义的 Svelte 颜色选择器组件,例如 svelte-color-picker
let { color, onChange } = $props<ColorPickerProps>();
</script>
<!-- 颜色选择器的自定义实现 -->
<!-- DialogColorPicker.svelte -->
<script lang="ts">
import type { CreateCalendarDialogColorPickerProps } from '@dayflow/core';
let { color, onChange, onAccept, onCancel } = $props<CreateCalendarDialogColorPickerProps>();
</script>
<!-- 弹窗颜色选择器的自定义实现 -->右键菜单插槽
eventContextMenu 和 gridContextMenu 插槽允许您用完全自定义的 React 组件替换默认的右键菜单。两个插槽都接收 onClose 回调以关闭菜单。
eventContextMenu— 当用户右键点击事件时触发,接收{ event, onClose }。gridContextMenu— 当用户右键点击日历网格空白区域时触发,接收{ date, viewType, onClose }。
右键点击任意事件或空白格子,查看自定义菜单效果:
查看源代码
import { useCallback } from 'react';
import { DayFlowCalendar } from '@dayflow/react';
import type {
  EventContextMenuSlotArgs,
  GridContextMenuSlotArgs,
} from '@dayflow/core';

function MyCalendar() {
  const eventContextMenu = useCallback(
    ({ event, onClose }: EventContextMenuSlotArgs) => (
      <div className='custom-menu'>
        <button
          onClick={() => {
            /* 复制 */ onClose();
          }}
        >
          复制
        </button>
        <button
          onClick={() => {
            /* 分享 */ onClose();
          }}
        >
          分享
        </button>
        <button
          onClick={() => {
            calendar.deleteEvent(event.id);
            onClose();
          }}
        >
          删除
        </button>
      </div>
    ),
    []
  );

  const gridContextMenu = useCallback(
    ({ date, onClose }: GridContextMenuSlotArgs) => (
      <div className='custom-menu'>
        <button
          onClick={() => {
            /* 在此创建事件 */ onClose();
          }}
        >
          新建事件
        </button>
        <button
          onClick={() => {
            /* 设置提醒 */ onClose();
          }}
        >
          设置提醒
        </button>
      </div>
    ),
    []
  );

  return (
    <DayFlowCalendar
      calendar={calendar}
      eventContextMenu={eventContextMenu}
      gridContextMenu={gridContextMenu}
    />
  );
}<template>
<DayFlowCalendar :calendar="calendar">
<template #eventContextMenu="{ event, onClose }">
<div class="custom-menu">
<button @click="/* 复制 */ onClose()">复制</button>
<button @click="/* 分享 */ onClose()">分享</button>
<button @click="calendar.deleteEvent(event.id); onClose()">删除</button>
</div>
</template>
<template #gridContextMenu="{ date, onClose }">
<div class="custom-menu">
<button @click="/* 在此创建事件 */ onClose()">新建事件</button>
<button @click="/* 设置提醒 */ onClose()">设置提醒</button>
</div>
</template>
</DayFlowCalendar>
</template>
<script setup>
import { DayFlowCalendar } from '@dayflow/vue';
</script>import { Component } from '@angular/core';
import { DayFlowCalendarModule } from '@dayflow/angular';
@Component({
selector: 'app-root',
standalone: true,
imports: [DayFlowCalendarModule],
template: `
<dayflow-calendar
[calendar]="calendar"
[eventContextMenu]="eventMenu"
[gridContextMenu]="gridMenu"
>
</dayflow-calendar>
<ng-template #eventMenu let-args>
<div class="custom-menu">
<button (click)="/* 复制 */ args.onClose()">复制</button>
<button (click)="/* 分享 */ args.onClose()">分享</button>
<button (click)="calendar.app.deleteEvent(args.event.id); args.onClose()">删除</button>
</div>
</ng-template>
<ng-template #gridMenu let-args>
<div class="custom-menu">
<button (click)="/* 在此创建事件 */ args.onClose()">新建事件</button>
<button (click)="/* 设置提醒 */ args.onClose()">设置提醒</button>
</div>
</ng-template>
`
})
export class AppComponent {
// calendar = ...
}<!-- App.svelte -->
<script lang="ts">
import { DayFlowCalendar } from '@dayflow/svelte';
import EventMenu from './EventMenu.svelte';
import GridMenu from './GridMenu.svelte';
</script>
<DayFlowCalendar
{calendar}
eventContextMenu={EventMenu}
gridContextMenu={GridMenu}
/>
<!-- EventMenu.svelte -->
<script lang="ts">
import type { EventContextMenuSlotArgs } from '@dayflow/core';
let { event, onClose } = $props<EventContextMenuSlotArgs>();
</script>
<div class="custom-menu">
<button onclick={() => { /* 复制 */ onClose(); }}>复制</button>
<button onclick={() => { /* 分享 */ onClose(); }}>分享</button>
<button onclick={() => { calendar.deleteEvent(event.id); onClose(); }}>删除</button>
</div>
<!-- GridMenu.svelte -->
<script lang="ts">
import type { GridContextMenuSlotArgs } from '@dayflow/core';
let { date, onClose } = $props<GridContextMenuSlotArgs>();
</script>
<div class="custom-menu">
<button onclick={() => { /* 在此创建事件 */ onClose(); }}>新建事件</button>
<button onclick={() => { /* 设置提醒 */ onClose(); }}>设置提醒</button>
</div>年视图 Grid 弹窗
当年视图运行在 grid 模式且 gridDateClick: 'popup'(默认值)时,点击日期单元格会打开一个列出当日事件的弹窗。gridPopupContent 插槽允许您用自己的 UI 替换该弹窗的内容。
该插槽必须作为 prop 传给 <DayFlowCalendar>,而不是传给 createYearView。框架渲染的节点(React、Vue 等)必须通过插槽系统流转;将它们通过核心视图配置传递会导致 Preact 崩溃。
import {
  useCalendarApp,
  DayFlowCalendar,
  createYearView,
  ViewType,
  type GridPopupContentSlotArgs,
} from '@dayflow/react';

function renderYearGridPopup({ date, events }: GridPopupContentSlotArgs) {
  return (
    <div className='rounded-xl border bg-white p-3 shadow-xl'>
      <div className='text-sm font-semibold'>{date.toDateString()}</div>
      {events.length === 0 ? (
        <div className='text-gray-400'>暂无事件</div>
      ) : (
        events.map(e => <div key={e.id}>{e.title}</div>)
      )}
    </div>
  );
}

function MyCalendar() {
  const calendar = useCalendarApp({
    views: [
      createYearView({
        mode: 'grid',
        gridDateClick: 'popup',
      }),
    ],
    defaultView: ViewType.YEAR,
  });

  return (
    <DayFlowCalendar
      calendar={calendar}
      gridPopupContent={renderYearGridPopup}
    />
  );
}